


In this article we are going to talk about what ECS is and present you a tutorial on how to deploy an API built using Python’s FastAPI framework and packaged in a Docker image. We assume you have previous knowledge of Python and Docker to follow it through.
What is ECS
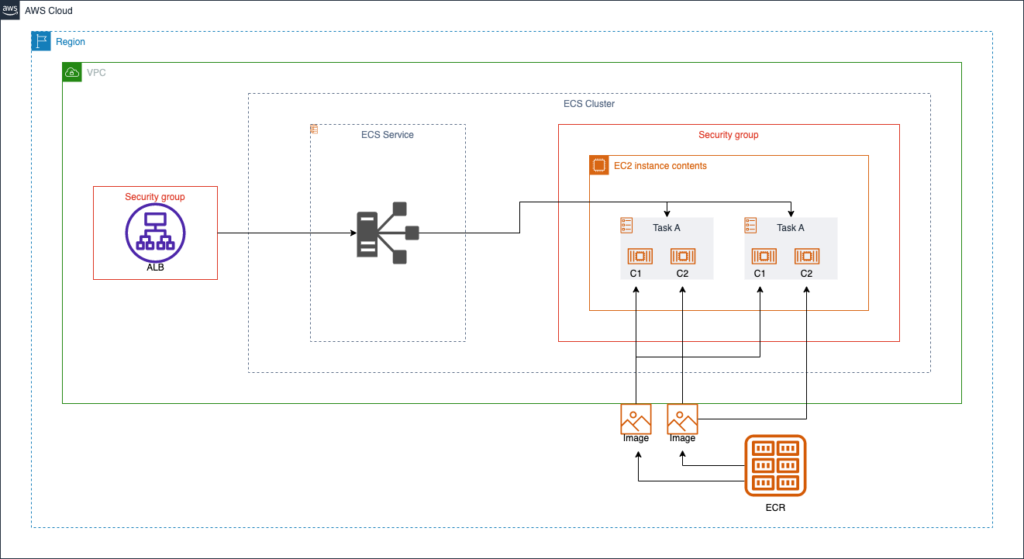
Amazon Elastic Container Service (ECS) is a container management service that offers orchestration, service discovery, serverless deployment, and more for your containerized applications.
If you’re looking for a more thorough ECS Overview Video, check out my article here.
ECS Key Concepts
In summary, ECS is about configuring services to maintain and scale tasks defined by task definitions running on a cluster. Tasks may run on two different launch types. The first is a serverless manner called Fargate, and the other is traditional EC2 instances.
Task Definition
Task definitions are the configurations of a group of 1 up to 10 containers that will run together once initialized. These containers can be short or long-lived.
In a task definition, you choose how much of the instances resources you are going to allocate and how much each container may consume of these pre-allocated resources. Aside from each container’s resources you also configure things like the images to be used, the ports to open, the environment variables, etc.
Task
A task is the instantiation of a task definition within a cluster.
Cluster
Your tasks and services run on infrastructure that is registered to a cluster. Clusters are used to separate groups of services and/or independent tasks from each other in a given region. Clusters support both launch types simultaneously.
Fargate
Fargate is a serverless option for running containers. Fargate instances are managed by AWS and may run only one task at a time. These instances may be configured with as little as .25 vCPU and 512MB of RAM up to 16 vCPU and 120GB of RAM with storage ranging from 20 to 200GB. The RAM must always match 2x to 8x the vCPU configuration.
EC2 Container Instance
ECS container instances are EC2 machines running an ECS-optimized AMI. They are configured to run tasks of a particular ECS cluster. These instances can run as many tasks as their resources can handle.
Example
You can write a task definition that allocates 4 vCPU and 8GB of RAM and has 3 containers C1, C2 and C3, where C1 and C2 get 1vCPU and 2GB of RAM each and C3 gets 2 vCPU and 4GB of RAM. Now, imagine an EC2 instance with 8 vCPU and 16GB of RAM. Not considering the resources used by the OS, you could run 2 tasks defined by this task definition. Note that if you are using Fargate, you have to instantiate two machines, one for each task. The resources will be provisioned automatically according to the task definition.
Application Types
Standalone Task
A standalone task is a task that you start manually or programmatically. They are ideally short-lived and stop after finishing their execution. It is recommended fork workloads such as batch jobs.
Services
As opposed to a standalone task, a service enables you to maintain a specified number of tasks running in a cluster. If for any reason, a task fails, the service automatically instantiates another one for you to replace it. Services are the recommended way to run web applications, for example.
Some other features are comprised by services, such as:
- If you need to run several copies of a task you can put a service as a target group behind a load balancer and have it distribute the load for you.
- You may configure auto scaling for your tasks according to metrics and alarms you define in CloudWatch, for more information on this check [link].
- Services allow you to define deployment policies such as rolling updates or blue/green deployments when updating the task definitions.
What is ECR
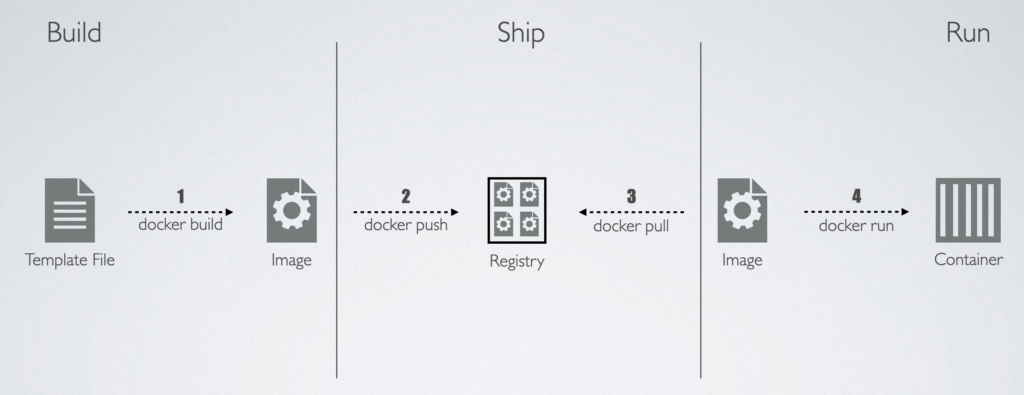
Amazon Elastic Container Registry (ECR) is AWS’ implementation of the Open Container Initiative (OCI) Distribution Specification. OCI suggests a “build, ship, run” philosophy for dealing with packaging and delivery of containerized applications. What it means is, you build an image, ship it somewhere and retrieve it when you need to run a container. The place where you ship your images to retrieve it from is called a registry, such as ECR.
How ECS uses ECR
When you define an image to be used in a Task Definition, you specify an image URI that will point to a container registry where ECS will fetch the image from when initializing a task. When using AWS ECS, you can benefit from better performance and less cost by using ECR to store your images.
Tutorial
Part 1 – Application
For our application we are going to use the FastAPI’s guide on how to deploy the framework as a reference, with some minor changes. The complete guide with recomendations can be found at https://fastapi.tiangolo.com/deployment/docker.
- Step 1.1 – Start by building your folder structure as follows:
src
├── app
│   ├── __init__.py
│   └── main.py
├── Dockerfile
└── requirements.txt
- Step 1.2 – Add the following requirements to
requirements.txt.
fastapi
uvicorn
from fastapi import FastAPI
from typing import Union

app = FastAPI()


@app.get("/")
def read_root():
    return {"Hello": "World"}


@app.get("/items/{item_id}")
def read_item(item_id: int, q: Union[str, None] = None):
    return {"item_id": item_id, "q": q}
This code defines two callable routes when the API is running. One in / and another in /items/{id}. Both routes respond to the HTTP method GET only.
- Step 1.4 – In your
Dockerfilewrite:
FROM python:3.10-slim

WORKDIR /code

COPY ./requirements.txt /code/requirements.txt

RUN pip install --no-cache-dir --upgrade -r /code/requirements.txt

COPY ./app /code/app

CMD ["uvicorn", "app.main:app", "--host", "0.0.0.0", "--port", "80"]
When an image is built using this definition, it starts by fetching the python:3.10-slim base image from the docker public registry. Then, copies the requirements.txt file and install the requirements using pip. Finally, it copies the app folder. When a container starts it runs the uvicorn ASGI webserver using the app defined in main.py.
Part 2 – ECR
To follow this part make sure you have Docker and the AWS CLI installed. To know how to install and configure them refer to [link] and [link], respectively.
- Step 2.1 – Create a Repository:
You can create a new ECR repository using the AWS CLI by running the command:
aws ecr create-repository --repository-name <repository_name>
or by using the console as shown below.
- Go to the Elastic Container Registry console in the AWS Management Console and click Create Repository

- Choose a name and click Create Repository. You can leave other configurations as default.
- Once the repository is created, copy your repository URI for the next step.
- Then, click on View Push Commands[2]. Save the commands for later use. You will be using commands 1 and 4, and a merge of commands 2 and 3.
- Step 2.2 – Build the Image:
- On your terminal, go to the
src/folder and run
docker build -t <repository uri>:latest .to build your image and tag it with<repository uri>:latestin one step. This is a merge of commands 2 and 3.- Run your container locally with
docker run <repository uri>:latestto make sure everything is working as expected. You should see an output similar to what is presented below.
Note that our API is set to run on port 80, as defined by theuvicorncommand in theDockerfile. We will need this information later when defining our container in our task definition. - On your terminal, go to the
- If everything is working, log into ECR by running the authentication command:


aws ecr get-login-password --region <region> | docker login --username AWS --password-stdin <aws account id>.dkr.ecr.<region>.amazonaws.com
This is the command 1 you’ve saved on the previous step. You should see the output below.

- If the login succeeds, run:
docker push <repository uri>:latest
to push the image to the repository. This is command 4.
- When the image finishes uploading to ECR, you will be able to see it on the repository console.

Part 3 – ECS
- Step 3.1 – Create a Cluster:
- Go to the Elastic Container Service console in the AWS Management Console. Select clusters in the left side panel and click Create Cluster. You will be presented with the following page:
- Choose a name for the cluster and the VPC you would like it to run tasks on. You can also choose to create EC2 container instances while creating your cluster. We are not going to approach this in this tutorial.
- Under Monitoring Enable Use Container Insights and click Create.
- Go to the Elastic Container Service console in the AWS Management Console. Select clusters in the left side panel and click Create Cluster. You will be presented with the following page:

- Step 3.2 – Create a Task Definition:
- Go to the ECS console and select Task definitions in the left side panel and click Create new task definition, and click it once again.
- Define a family and a container named app with a port 80 created. You can leave the rest with the default values. Click Next.
- Choose a task size of .25vCPU and .5GB of Memory. As we only have one container, configure the container size of the container app to match the task definition’s specification. Click Next.
- Go to the ECS console and select Task definitions in the left side panel and click Create new task definition, and click it once again.


Task Role
The task role is the permissions your containers will have when a task is running. You might need to download something from S3 during runtime. This is the role you should configure with permissions to do so. Task Execution Role
Task Execution Role
The Task Executions role is the permissions the container agent that fetches your images and setup your environment will have when starting tasks. You might permissions such as fetching secrets or parameters from secrets manager or the paramter store to set as environment variables, for example. This is the role you should configure with permissions to do so.
- Review and click Create.
Part 4 – Run a Standalone Task
Step 4.1 – Configure the task:
- On your newly created task definition click on deploy, then select Run task.
- On the configuration page select the cluster you’ve created in the previous step and select launch type, then fargate.
- Under Networking, select the VPC associated with your cluster and a couple of **subnets. Select a security group that allows access to HTTP protocol on port 80. This is the port and protocol our container is configured to receive requests.
- Make sure Public IP is active, sometimes ECS fails to fetch images when this is turned off.
- Task and Container overrides are used to replace task and container configurations for a launch. We don’t need to change anything.
- Click Create.


Step 4.2 – Verify if the task started:
- Once a task is created you can check its status under your Cluster’s console.
- Click on the task id under Task to open the tasks console.
- Wait for the Last Status to be running, you can poll the logs to see the activity and if any errors occur.
- Grab the Public IP umder Configuration


Step 4.3 – Test the API:
- Go to http://<your_public_ip>/docs to open FastAPI’s auto-generated Documentation page to see if its working properly.
- You can also make a request to one of the endpoints we’ve created.


- Step 4.4 – Stop the task:
- Make sure to go back to the Taks’ Console and stop the task on the top-right corner, so you don’t have any charges.
Part 5 – Create a Service
- Step 5.1 – Create the service:
- On your Task definition’s console click on deploy, then select Create Service.

- Just as with the Standalone task, configure your launch type.
- Under Deployment configuration select replica and set desired tasks to 1.
- Just as with the Standalone task, configure your networking. We are not going to need load balancing for now. Click Create
- Step 5.1 – Verify the service is running:
- On your Cluster’s Console you can see all your running services. Click the one you’ve just created.


- On your Service’s Console under Configuration and Tasks you will find your running tasks and their Ids. You can check if they are working just as you did with the standalone task.

Overall, AWS ECS and ECR are powerful tools that can help you to deploy, manage and scale your containerized applications. They provide a way to automate the management of clusters and resources, as well as a way to store and distribute your container images in a private and secure way. With the knowledge gained in this article, you are ready to build and deploy your own applications using these services on AWS.

