Trying to understand how to write or put a record into to a AWS Kinesis datastream using Python and boto3? This is the article for you.
Note that a github link containing the full code is available at the bottom of this article.
Kinesis PutRecord API
Kinesis’ PutRecord API is used to write a single record to a stream at a time. This API will place a record on a shard. Your Kinesis Datastream is comprised of multiple shards. Each one is capable of processing up to 1,000 records per second or 1MB write total before throttling may occur.
The serverless version of Kinesis automatically determines how many shards you have assigned to your stream. The provisioned mode allows you to control this setting.
You can learn more about the exact details of this api over at this link from the boto3 documentation.
Before you start, remember that you need proper IAM Permissions in order to interact with Kinesis. For writing to kinesis, you require the kinesis:PutRecord permision. Make sure that the user or role you are using has this permission. If you don’t know how to create an IAM user/role with a policy, check out my YouTube tutorial here.
To use this API, we need to import some dependencies include json and boto3.
import json
import boto3
Next we need to get a reference to our kinesis client. This will allow us to interact with Kinesis APIs.
kinesis = boto3.client('kinesis')In our calling code (in this case I’m using a Lambda Function), we formulate an input in the form of a python dictionary.
record1 = {"personId": 1}From here, we are free to use the put_record api and storing the response in a response variable.
response = kinesis.put_record(
    StreamName="TestStream",
    Data=json.dumps(record1),
    PartitionKey="1")
    # optional - ExplicitHashKey='string',
    # optional - SequenceNumberForOrdering='string'
The StreamName field corresponds to the name of our Kinesis stream. Under Data, we use the json library’s .dumps method to convert our dictionary object into a json string.
PartitionKey corresponds to the input being used to the internal Kinesis hash function. The result value is a determines the kinesis shard the record will be placed on. Shards are a core concept in the world of Kinesis – you can learn more about them here.
We use an arbitrary value “1” here. In real life, you should use a randomized value like a UUID.
There are also two optional fields that can be useful in certain situations.
The ExplicitHashKey setting is a way to ensure the record you are writing lands on a specific shard.
The SequenceNumberForOrdering key is a way to ensure that records that are written serially are processed by the server in a deterministic order. For example, if you were writing records using the put_record API in a for loop, you would set the count or i field to be your SequenceNumberForOrdering. This will ensure the records are processed in order on Kinesis’ side.
These last two settings are more of an advanced concept. You can learn more about them in the Kinesis Documentation.
Next, we simply print our response:
print(response)When we run our code, we get the following:
{
   "ShardId":"shardId-000000000002",
   "SequenceNumber":"49635372448349507151903025905428246575558653918903795746",
   "ResponseMetadata":{
      "RequestId":"e1850a84-c9d7-1037-ba71-c2973ff7d0d3",
      "HTTPStatusCode":200,
      "HTTPHeaders":{
         "x-amzn-requestid":"e1850a84-c9d7-1037-ba71-c2973ff7d0d3",
         "x-amz-id-2":"0PQTDFoSStlBp/P/jv1z+8R5EArGziQI/KYLaP77RTr1+CLLOzT8XoPJCeswYEd1D0BNyAGwrMPh2DnBzy3CZIWVC3ySEERh",
         "date":"Mon, 21 Nov 2022 00:26:59 GMT",
         "content-type":"application/x-amz-json-1.1",
         "content-length":"110"
      },
      "RetryAttempts":0
   }
}
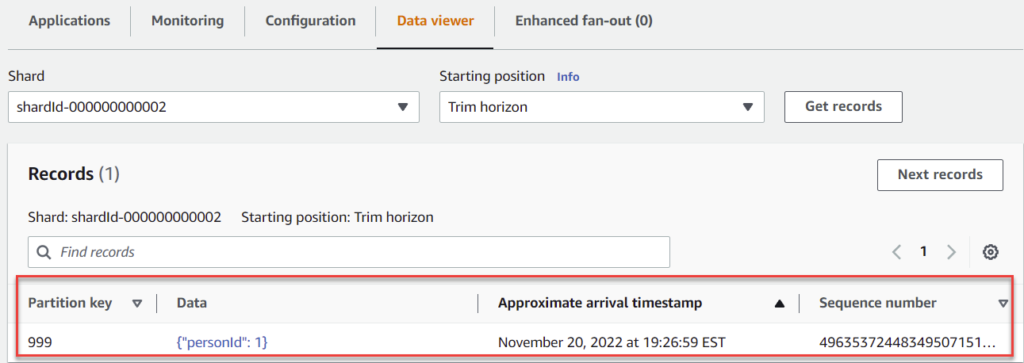
Note the ShardId field. We’ll now go to the AWS console and use the Data Viewer feature to see the data in our stream.
As you can see in the AWS Console, our code has landed in our Kinesis stream successfully.

Links
For complete code used in this article, see this link on github.
For boto3 documentation on the PutRecord API, see this link from the official documentation.
You may also enjoy:


