


Learn about the core concepts of AWS IAM. Just enough to get you started, not too much to overwhelm you with detail. This article is intended for beginners, but can also be a useful refresher for more experienced users.
AWS IAM is what I consider to be a foundational service for any cloud operator. It is one of the first, if not THE first AWS service you should learn right there beside the big boys like Amazon S3 or DynamoDB.
In this blog post, I’m going to explain to you the fundamentals of AWS IAM. I’m going to cover enough detail so that you can hit the ground running on your journey in AWS. But I’m not going to overwhelm you with the finer grain details.
We’ll start by reviewing IAM core ideas: Resources, Actions, and Policies.
From there, I’ll describe the process of IAM Authorization through a example. We’ll briefly touch on the different methods to interact with AWS that are facilitated by IAM (through the console, the aws CLI, or programmatically).
Afterwards, we’ll dive a bit deeper into Resources, Actions, and Policies by taking a look at a policy document. Finally, I’ll explain some other important concepts including Groups, Roles, and Trust Relationships.
So lets get started …
Prefer a video format? Watch my YouTube video on this topic here.
A Quick Primer
Before jumping into the details I want to take a few moments to cover some of the basic concepts to outline what’s to come.
First of all, let’s demystify IAM. It stands for Identity and Access Management and is the service that regulates access to AWS resources. Since accessing resources is one of the most basic things you can do on AWS, its understandable why this topic is so important.
So how does IAM do this? Well it turns out there are 3 basic ideas at play.
Core Idea 1 – Resources
Resources are the entities that you create in AWS. This can include thing’s like an S3 bucket, an S3 Object, or a DynamoDB tables. All resources in AWS are represented by something called an ARN or Amazon Resource Name. You’ve probably seen one of these identifiers before, they look a little like this: arn:aws:s3:::test-website-awssimplified.
Throughout our time using AWS, we’ll consistently reference back to ARNs. They are the way that we as users uniquely identify the things we create in AWS.
Core Idea 2 – Actions
Actions are the operations that users attempt to perform on resources. For example, if I created a lambda function, I may want to update its configuration. In order to do that, I need to use an API called lambda:UpdateFunctionConfiguration. In order to perform this action, I need to have permissions to call this API. But how do I get permissions?
The answer lies in the Policy …
Core Idea 3 – Policy / Policy Document
The heart of AWS IAM is the Policy. IAM policies refer specific JSON documentats that define user permissions to access a resource. In other words, authorization to perform an Action is determined by whether or not the user has the appropriate Policy Document with associated permissions.
You may be a bit confused about these concepts, but don’t worry, we’ll clarify shortly. For now, just remember that IAM involves guarding access to resources by controlling who can perform actions based on the user’s policy document.
Example – Managing Access to Create a Lambda Function
Let’s take a closer look at these concepts by looking at an example.
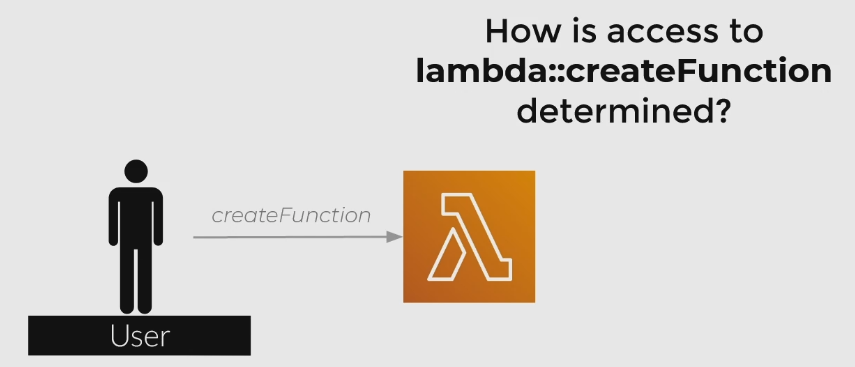
Assume for a moment we have a User (say me, Daniel) that is trying to create a Lambda function in the AWS console. How does AWS determine if I have permission to do this?
The answer lies in the Policy that is currently associated with this user. In IAM, if a user does not have explicit permission to access a resource, they will not be able to. This means that AWS IAM takes a proactive approach – it denies everything by default unless you specify that something should have permission.
Side bar – there’s also the ability to explicitly deny access to a resource. Explicit Denial involves writing an entry in your policy document that specifically calls out an API or group of APIs that this user should NOT have access to. Explicit Denies always take priority over Allows, so if there is ever a conflict, Deny will win.
Back to our main point at hand – AWS determines if we have permission to perform an action on a resource if we have the provided policy document associated with this user.
If a user does not have access (implicit or explicit), the user will be greeted with the dreaded Access Denied error. If you haven’t seen this error in your cloud journeys, get ready, because I guarantee you will.
So in order for this user to access this lambda:CreateFunction is based on the user’s policy document. So what does a policy document look like? Lets look at one now.
Examining a IAM Policy Document
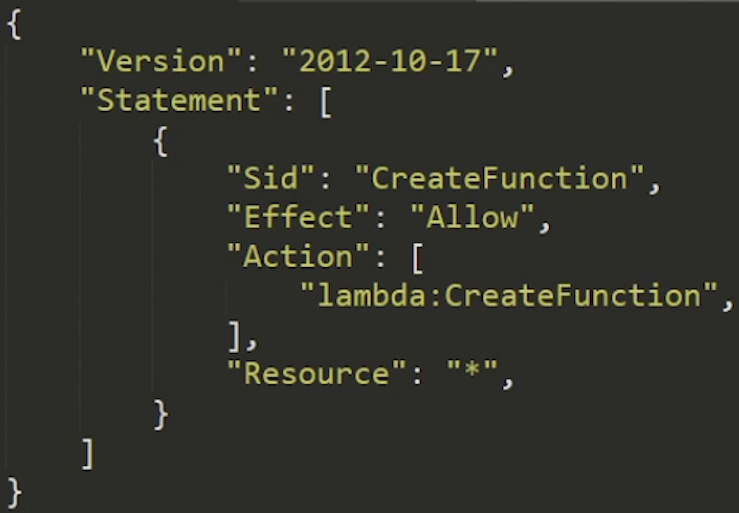
The image above is a policy document that will allow our user permission to create a Lambda function, but not much else.
Lets inspect some of the elements.
Version – This is some arbitrary mystery value and rarely changes. Literally – its value is always 2012-10-17. For all intensive purposes, it doesn’t matter.
Statement – The statement contains the meat of the policy document. As can be seen in the image, there can be multiple statements within a single policy document that define access to different resources.
SID – Stands for Statement ID. Just a unique identifier for your statement.
You may enjoy this other article on SNS vs SQS vs Eventbridge
Effect – Two possible values, Allow or Deny. Allow to be used to grant access, Deny to be used to explicitly restrict access.
Action – The AWS operation that you’re trying to perform, usually 1:1 to the name of the API. Actions are namespace by the service. For example, S3’s action to create a bucket is – you guessed it – s3:createBucket.
Resource – The resource is the element we are guarding access to. We can specify a specific ARN of a resource to define granular access controls. If we want to be more liberal, we can use wildcards represented by asterisks ( * ).
Principal – An optional value. Principals help us create policies that apply to specific users, if appropriate.
Hopefully this basic example is clear to you and helps you understand some of the basics of guarding access to AWS through IAM. I want to quickly take a pause and describe some of the other methods to identify yourself to AWS so that it can determine who you are (aka authentication. Since our IAM policies are mostly based on the concept of a user, its important to understand some of the access vectors.
Accessing AWS Using Your IAM User
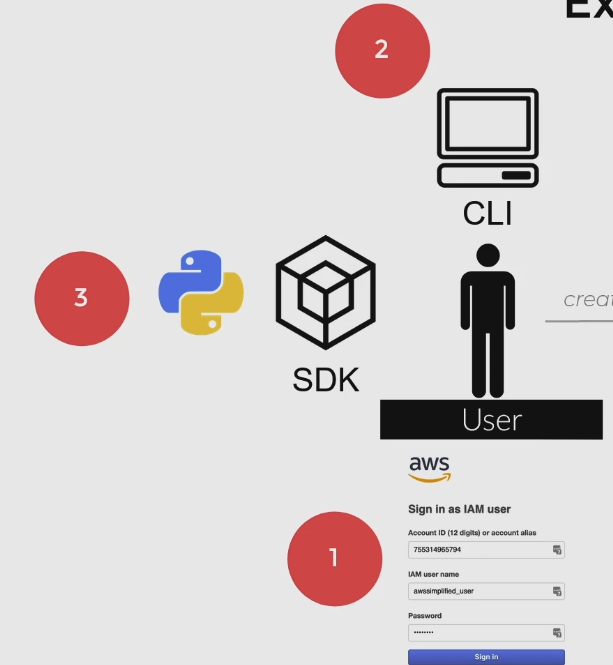
In order to interact with AWS, we basically have three options:
- Through the UI Console – Most likely the way you first used AWS, by poking around on the AWS Management Console. When you sign into the console, you can either do it as the Root User (aka, signing in using your original account creating email), or as a normal User through the account-level access portal. All accounts have a unique URL to use your user credentials to log into the console. Users have policy documents stored against them, so your permissions on AWS will be restricted to whats inside the document.
- Through the AWS CLI – Probably the second most popular way to access AWS. Using the AWS CLI, we must provide our
aws-access-keyandaws-secret-access-keyas a configuration step. These are alphanumeric strings that are unique to each user and serve as their login credentials when accessing AWS programmatically. Through the CLI, we can issue commands to call AWS APIs. Again, our access is restricted to what’s contained in the User’s policy document. - Programmatically Using a SDK – The final way is through an SDK to call AWS APIs. There are many SDKs provided by AWS in a variety of different popular programming languages. When attempting to access an API programmatically and with an SDK, we need to create a client, and usually instantiate it with our
aws-access-keyandaws-secret-access-key.
Another Example – Managing Access to a DynamoDB Table
Lets explore another, more interesting example that uses a couple other features of IAM. This policy document will be to allow read only access to specific columns of a DynamoDB Table.
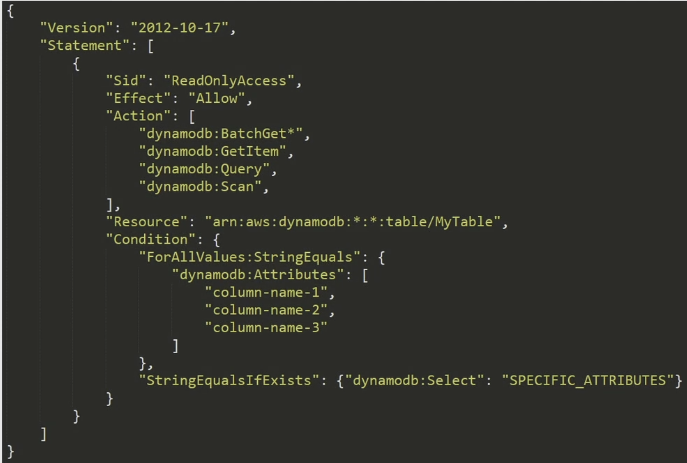
This policy document is similar to the example we looked at previously, but has some interesting characteristics. First of all note that in the Action section, we have multiple actions listed here. Additionally, we are using a wildcard for the dynamodb:BatchGet* action.
Its important to note here that wildcards can be used in many parts of the policy document, ranging from principal, resource, to even part of actions themselves. This notation is indicating that any action that starts with BatchGet will be allowed according to this policy document. For example, BatchGetItem would be an allowed action here.
Also notice under the Resource section we are taking further advantage of wildcards in this statement: arn:aws:dynamodb:*:*:table/MyTable. The two *’s here correspond to region and account number. The table/MyTable section is saying that these actions only apply to this particular table (or any pattern that matches it). The *’s here are used to substitute for region (i.e. us-east-1) and account number (i.e. 755018473).
This means that the actions in this policy apply to a table name called MyTable that can exist in any region and under any account. This is a useful policy if you have a multi-stack environment and looking to create one policy allows READ access to any of those tables.
Finally, the Conditions section of the policy allow for some interesting functionality. Conditions allow us to specify context in which this policy takes affect.
In the policy above, the parts under ForAllValues:StringEquals and subsequent listed attributes are telling IAM that we want to restrict our permissions to just a specific set of column names as part of our table. There are a whole bunch of other condition keys we can use other than dynamodb:Attribute. This one in particular is unique to dynamo and allows us to restrict column level access.
The last portion, StringEqualsIfNotExists and corresponding dynamodb:Select statement is another requirement to enable the column level access control for dynamo.
Don’t worry if you don’t understand too much about Conditions. You can get really far in your AWS journey with having zero or limited knowledge about them. For now, just know that they exist and generally what they do. If your curious about learning more about them you can read up on the IAM Condition docs here.
Other Important Concepts – Groups, Roles, and Trust Relationships
So far, I’ve explained to you enough about AWS IAM to get you pretty far, but there are some other concepts that you may come across and should know about. Lets explore them now.
Groups
IAM groups are simply a collection of AWS Users. They are an important organizational toolkit to help you assign similar permissions to a collection of users at once. You can visualize this concept in the image below:

Using groups, you can associate users added to the group with a default IAM policy. This is really helpful if you have collections of users that require common permission levels. For example, I may create an “Internal Developer” group that has very liberal policies on the account. In contrast, I may have a “Contractor” group that has some narrow permissions only applicable to the project they are working on.
You can use groups in a whole bunch of ways to organize users and control access to resources in one go. For more information on groups, check out the documentation here.
Roles
Roles are similar to users in the sense that we can attach IAM policies to them. However, unlike Users, Roles are meant to grant short term access to resources. In other words, if I want to grant short term access to a user to provide a certain job function, say as an administrator, I may grant them the ability to assume a specific role. In doing so, the user will have all permissions defined under the assumed rule’s policy document. Roles can be used by many different users and at once if necessary.
Roles can be assumed by both users and other AWS services. For instance, when creating a Lambda function, we need to specify a Role that the Lambda function will use. If our function needs to access DynamoDB for example, I will need to add dynamodb specific Actions to the role’s policy document.

I kind of like to think of Roles as wearing many different hats. We can assume different roles at different times depending on our job function or something short term that we may be trying to do. Interestingly, we can also create roles that allow for access to our resources from users in a different AWS account, which is our next topic for discussion.
Trust Relationships
Trust Relationships are not so much a core concept of IAM, but they are a source of problems that many developers run into which is why I think they’re worth discussing.
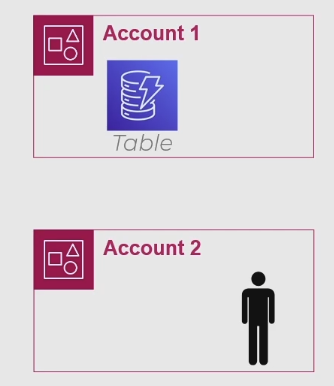
Trust Relationships allow us to create Roles that enable users from a DIFFERENT AWS account to temporarily gain access to it. For instance, consider an example like we have below where we have one account with a DynamoDB table, and a user from a different account wanting to get access to it.
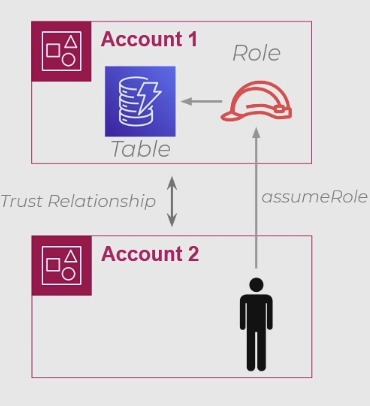
The way to provide access to a user in a different account is not immediately clear. In order to accomplish this, we need to make use of Trust Relationships and Roles. Firstly, we need to go to the IAM console and create a Trust Relationship between these two accounts. This process is bi-directional – Account 1 needs an entry saying “I trust Account 2” and Account 2 needs an entry saying “I trust Account 1”.
Further, Account 1 (which holds the resource trying to be accessed) needs to create a Role that has necessary access. From there, we need to grant the specific user from Account 2 the ability to assume that role. A more complete diagram of this process can be visualized below:
All in all, you shouldn’t generally provide direct access to your AWS resources by third parties – this should usually be done by exposing an API. However, there are some circumstances where shared access does make sense, and Trust Relationships is the means by which AWS makes this possible.
Pro Tips (as learned by my frustration)
Before we summarize, I want to take a few moments to share some pro tips I’ve collected over time. These tips are a result of years of experience using AWS, and hours of frustration bashing my head against the keyboard trying to figure out “why can’t my X access my Y?”.
Tip 1 – Protect Your Root Account
Your Root account is the ‘owner’ account of AWS. It is usually accessed by heading over to the AWS login page and logging in with the email you used to originally register the account.
The root account is special, its like the top level node in a organizational hierarchy. Using it, you have special abilities like the ability to revoke ANY other user account, or access account level billing information.
If a bad actor gets access to your root account – you have no recourse besides calling or emailing AWS itself to help you. If this happens, you might be in some trouble and can have some surprise bills from AWS to deal with.
Take my advice and create a user account for your day to day activities. Grant it Administrative access and be on your way. Don’t use your root account for day to day access, you’ll thank me later.
Tip 2 – Explicit Deny wins over Explicit Allow
As we discussed earlier, AWS IAM has two modes of access control: Allow or Deny. If for some reason you are stuck in a scenario where you have policies mapped against you that have both of the effect’s for the same resource, the Deny will always win. This can occur especially when assuming a role that you are not familiar with, so be aware.
This single issue caused me many hours of headaches and trauma. I hope it can save you some time.
Tip 3 – Use the Least Privilege Model
The least privilege model is a common security suggest to only grant the access level required to perform the necessary function, and no more. In other words, don’t be too liberal with your IAM policies and grant access to actions such as dynamodb:* for example (this grants access to all DynamoDB actions).
Doing so over-exposes your application to attack vectors and security holes if a bad actor by an off chance gets access to one of your IAM roles or users. Protect yourself in advance and only grant access to whats needed.
Tip 4 – Use the AWS Policy Simulator for IAM Debugging
The AWS Policy Simulator is a useful tool built by AWS that helps you simulate actions on your IAM policy. It is especially helpful if you’re stuck in a scenario where you think your policy should have access to a certain resource, but doesn’t.
Using the tool, you can select IAM Users you’ve created in your account and test access permissions as seen in the diagram below to run simulations.
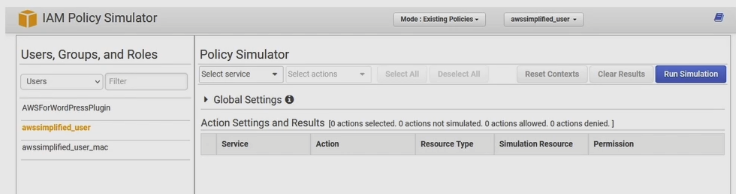
Policy Simulator can be accessed via https://policysim.aws.amazon.com. Make sure to login to your AWS account to let it access IAM User profiles that are currently present on your account so you can run simulations.
Summary
In this article, I’ve introduced you to the core IAM core concepts to get yourself started on learning AWS. As a quick summary of most of the things we’ve learned, remember the following:
We create users who use their credentials that grant access based on the contents of their policy document.
We create roles which can be assumed by entities within or across account boundaries with a trust relationship.
If you enjoyed this article check out the other ones I have on this site, and if you have any questions or comments, make sure to leave them below.


