


In a previous post, I talked a lot about the benefits of Infrastructure as code and how it can speed up your development process. In this tutorial, I’m going to be showing you how to get your hands dirty by deploying an AWS Cloudformation stack that will create a DynamoDB table and an IAM Access Role to query it.
First of all, lets briefly overview AWS’ Infrastructure as code solution: CloudFormation.
What is AWS CloudFormation?
AWS Cloudformation is a service that allows users to define their infrastructure as JSON or YAML templates, and get CloudFormation to take care of going out and creating the resources. Templates can be used to define any resource currently supported by Cloudformation, and allows users to create complex interdependencies between components.
For example, as we can see in the code below, I defined a YAML template file that is responsible for creating a DynamoDB Table, configuring the partition and hash keys, defining the provisioned capacity, and more details.
AWSTemplateFormatVersion: 2010-09-09
Resources:
  OrdersTable:
    Type: AWS::DynamoDB::Table
    Properties:
      TableName: AuthorsTable_prod
      AttributeDefinitions:
        - AttributeName: "AuthorName"
          AttributeType: "S"
        - AttributeName: "BookTitle"
          AttributeType: "S"
      KeySchema:
        - AttributeName: "AuthorName"
          KeyType: "HASH"
        - AttributeName: "BookTitle"
          KeyType: "RANGE"
      TimeToLiveSpecification:
        AttributeName: "ExpirationTime"
        Enabled: true
      ProvisionedThroughput:
        ReadCapacityUnits: "5"
        WriteCapacityUnits: "5"
    DependsOn:
      - DynamoDBQueryPolicy
Developers can combine any number of infrastructure resources they need for their project and deploy them all at once. CloudFormation is smart enough to detect changes from previous iterations, apply changes, and roll back the changes if any unexpected error is encountered.
Users create Stacks which are logical groupings of resources into a named AWS Entity. Usually stacks are grouped by application name. The template is deployed to the stack initially and changes are made. Subsequent updates require the user to modify the infrastructure require the user to create ChangeSets which are effectively just modified copies of a previous version of a template file.
If this seems a bit unclear at the moment, try taking a look at the flow diagram below.
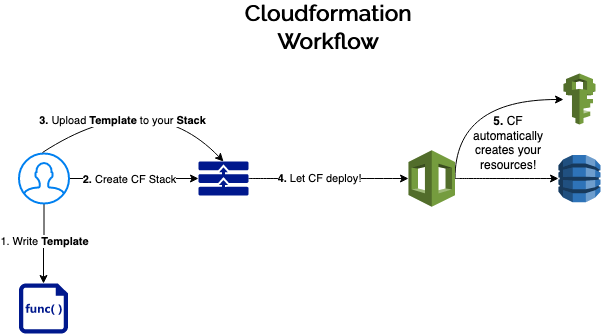
Note that I deliberately left out the concept of ChangeSets in the flow diagram above. Don’t worry though, we’re going to see how it works in the hands on example below.
Preparing a Template
To get started with cloudformation, we first need to create a template. For this exercise, we will use a template similar to the one above, with the one addendum to add a IAM role that can allow access to the newly minted DynamoDB table. This can be used by clients to perform queries on the table. Lets dissect this Template file for a moment here and define whats going on.
AWSTemplateFormatVersion: 2010-09-09
Resources:
  OrdersTable:
    Type: AWS::DynamoDB::Table
    Properties:
      TableName: AuthorsTable_prod
      AttributeDefinitions:
        - AttributeName: "AuthorName"
          AttributeType: "S"
        - AttributeName: "BookTitle"
          AttributeType: "S"
      KeySchema:
        - AttributeName: "AuthorName"
          KeyType: "HASH"
        - AttributeName: "BookTitle"
          KeyType: "RANGE"
      TimeToLiveSpecification:
        AttributeName: "ExpirationTime"
        Enabled: true
      ProvisionedThroughput:
        ReadCapacityUnits: "5"
        WriteCapacityUnits: "5"
    DependsOn:
      - DynamoDBQueryPolicy


  OrdersTableQueryRole:
    Type: "AWS::IAM::Role"
    Properties:
      AssumeRolePolicyDocument:
        Version: "2012-10-17"
        Statement:
          - Effect: "Allow"
            Principal:
              Service:
                - "dynamodb.amazonaws.com"
            Action:
              - "sts:AssumeRole"
      Path: "/"
  DynamoDBQueryPolicy:
    Type: "AWS::IAM::Policy"
    Properties:
      PolicyName: DynamoDBQueryPolicy
      PolicyDocument:
        Version: "2012-10-17"
        Statement:
          - Effect: "Allow"
            Action: "dynamodb:Query"
            Resource: "*"
      Roles:
- Ref: "OrdersTableQueryRole"- The Resources section defines the actual infrastructure resources we’re going to be creating, such as the DynamoDB Table and IAM Policy.
- As part of the OrdersTable, we define a bunch of attributes as they relate to DynamoDB tables. Every resource has a different set of required attributes so its best to check the documentation before getting started.
- Note that we can ‘Refer’ to other named resources from others. For instance, the bottom line shows that the OrdersTableQueryRole is being attached with the DynamoDBQueryPolicy. Even more complex creation dependencies can be accomplished using the DependsOn attribute (more on that later).
Create an Initial Stack
To create a stack, we simply go to the CloudFormation console and hit the ‘Create a Stack’ option. We’re going to use our template to create our DynamoDB and IAM resources. We do this by saving this template in a file, and uploading it in the CloudFormation console’s Create Stack wizard, like below:
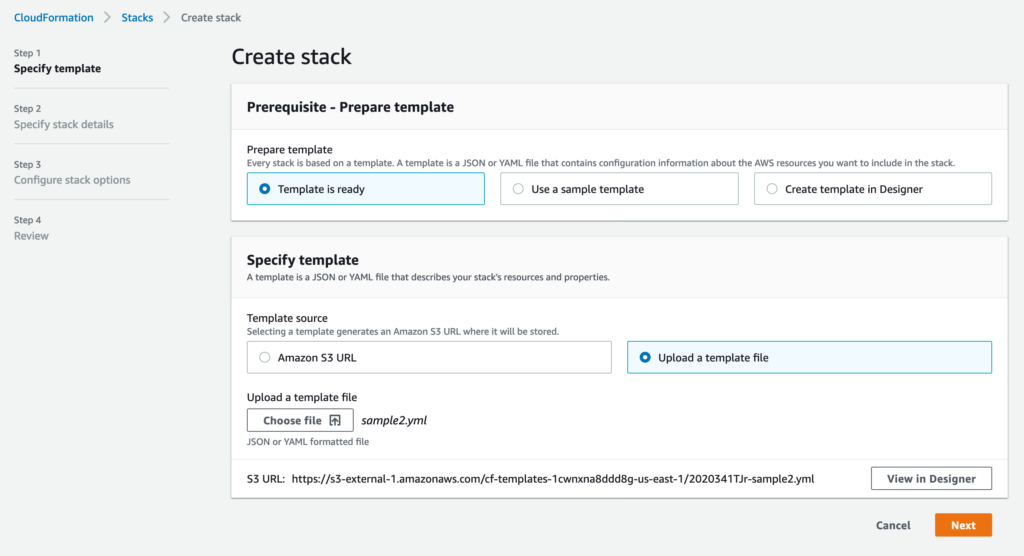
On the next screen, you’ll be asked to create a Stack Name. Pick a name that is reflective of your application. In this example, I called mine DemoStack.
Without getting too much into the advanced features of CloudFormation, suffice to say that you can keep on clicking Next until you get to the review page. There’s a lot of nuance to CloudFormation such as injecting dynamic variables into your stack to influence resource creation, but those topics are for another article.
After clicking Create Stack, you’ll be moved to the stack screen which shows your deployment progress. Mine looks a little bit like this:
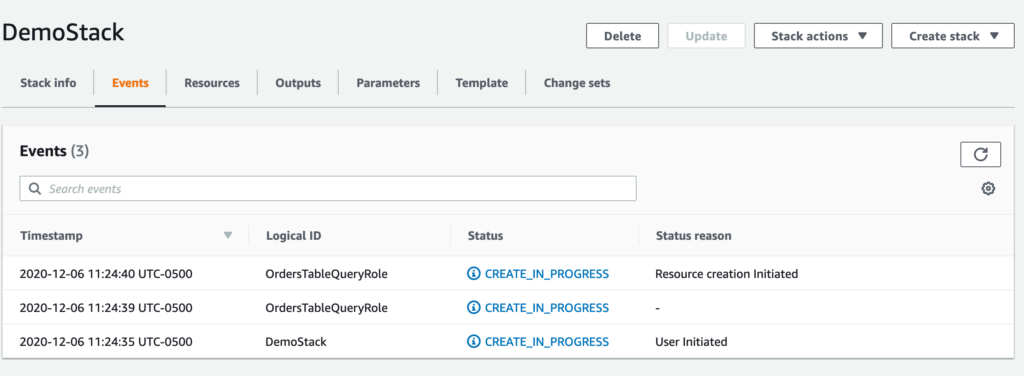
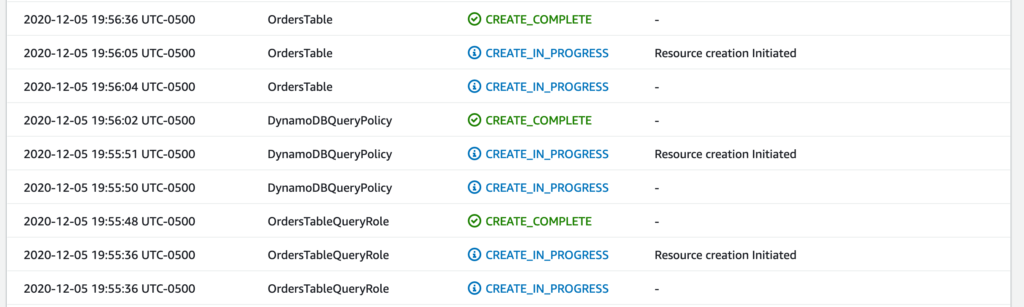
On this screen, you can monitor the deployment/modification of your resources and identify any errors if they come up. After a short time, your resources should be successfully created and your stack should look a little something like this:
Beauty, our resources have been successfully created! We can now go take a look at the DynamoDB section of the AWS console and see that our Orders Table has been successfully created!
I do want to point out an interesting behaviour that I kind of sneaked into our template. Note the order the resources are being created. Notice that CloudFormation is creating our OrdersTableQueryRole and DynamoDBQueryPolicy before it actually creates our table? Using the DependsOn attribute in the CloudFormation template, you can specify relationships between resources to create them in the right order. This is useful especially if you have resources that has values that are directly dependent on another resource. Not doing this may result in errors during your deployment process due to out of order resource creation.
Now, we’ve managed to successfully create an initial stack. What if we want to modify some of the resource’s values, for instance, modifying our DynamoDB Provisioned Capacity. We accomplish this by using ChangeSets.
Modifying Your Stack with ChangeSets
Now that our stack has been deployed, we can use ChangeSets to make updates to any of our infrastructure’s resources. Lets demonstrate this by modifying my table’s ReadCapacityUnits from 5 to 10 and see what cloudformation does.
I went back to my original template file and performed the modification. Now, we need to go back to the console to create the ChangeSet and deploy it.
To get to this screen, click on the ‘ChangeSets’ tab on the top navigation bar over the stack details. Afterwards, click on ‘Create Change Sets’ to launch the wizard. See below for a reference.

In the first page of the wizard, select Replace Current Template and upload your newly modified template where you modified the ReadCapacityUnits from 5 to 10.
Click ‘Next’ a few times and you’ll get an option to Create the Change Set. This will bring you to the home page for the change set, like Below.
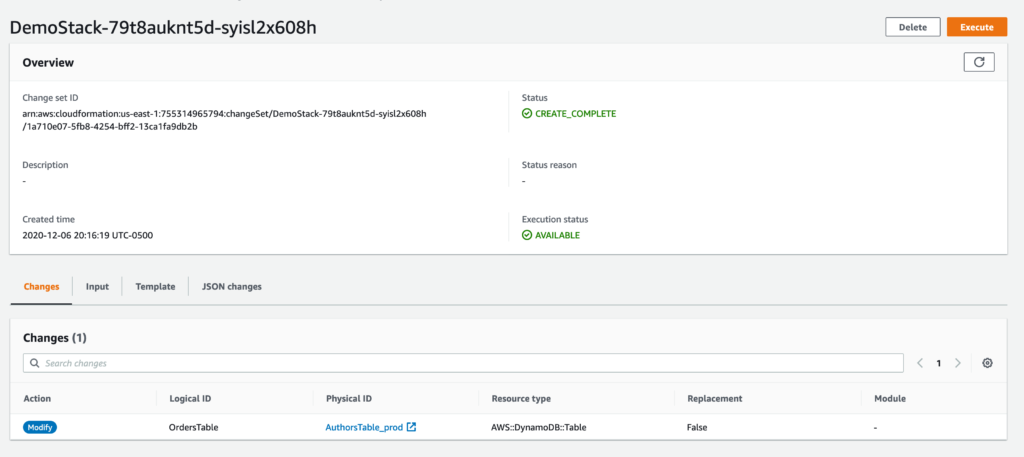
Notice here a couple interesting things. In the bottom Changes section, CloudFormation has automatically detected that there was a modification to my DynamoDB table as per my ChangeSet’s Template file. It does this by comparing its snapshot of state to the file youre uploading in order to determine if something has changed.
If you click on the JSON Changes tab on this screen, you’ll get a preview of some of the internals of how CloudFormation works. Its output is down below if you’re curious.
[
  {
    "resourceChange": {
      "logicalResourceId": "OrdersTable",
      "action": "Modify",
      "physicalResourceId": "AuthorsTable_prod",
      "resourceType": "AWS::DynamoDB::Table",
      "replacement": "False",
      "moduleInfo": null,
      "details": [
        {
          "target": {
            "name": "ProvisionedThroughput",
            "requiresRecreation": "Never",
            "attribute": "Properties"
          },
          "causingEntity": null,
          "evaluation": "Static",
          "changeSource": "DirectModification"
        }
      ],
      "changeSetId": null,
      "scope": [
        "Properties"
      ]
    },
    "type": "Resource"
  }
]
From here, we can go ahead and click on Execute in the top right hand corner of the screen. Doing so will trigger a deployment in CloudFormation and it’ll go out and modify your DynamoDB ReadCapacity setting. Cool!
Deleting Your Stack and its Resources
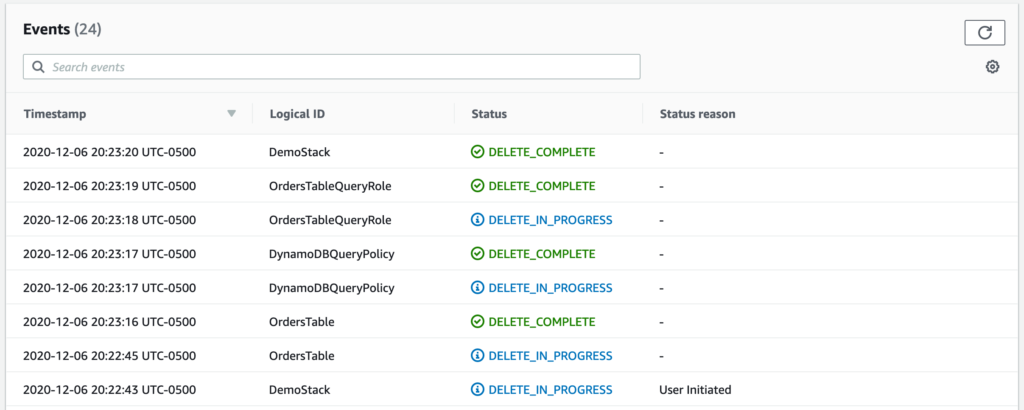
Another great part of CloudFormation is that you can delete all resources part of an application with one button click. CloudFormation takes care of keeping track of all the resources, and cleaning up all the extra stuff that gets created as part of infrastructure creation. See down below for an image of what the stack looks like after deletion.
Summary
In this post we defined what CloudFormation is, why its useful, and a hands on Demo of it in action. I hope its clear how easy it is to get started with CloudFormation using Template files and Stacks.
In an upcoming article, I’ll write about how to deploy CloudFormation stacks using a command line tool called SAM. Look forward to it!


