


In this article, you’ll learn how to create and configure an Amazon Aurora Serverless V2 postgres database.
AWS recently launched Amazon Aurora Serverless V2. In a previous article, I explained to you the difference between Aurora Serverless V1 and in V2. But in this article, I’m going to walk you through the steps to create and configure an Aurora Serverless V2 Postgres database.
We will walk through all the steps via the AWS console so you can follow along. At the end of this tutorial, you’ll have a completely serverless database ready for your next project. Note that you can also set up your database via CDK (Cloud Development Kit) or CloudFormation. However, I’m a firm believe that the best way to learn a new AWS service or feature is through the AWS Console.
Before we start, I want to remind you that Aurora Serverless V2 is not free. Reason being that the database will only scale down to a minimum .5 ACUs even when idle. If you use .5 ACUs (as we will in this article), it will cost you approximately $44 USD per month or 6 cents per hour.
So let’s get started.
1 – Navigate to the AWS RDS Console and Launch the Wizard
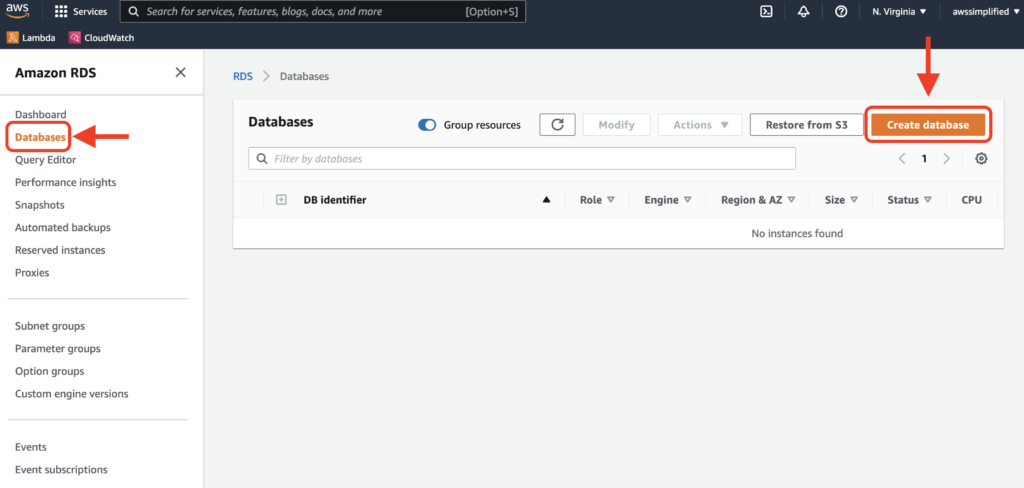
First thing’s first, head over to the AWS RDS (Relational Database Service) console. You can do this by typing in RDS in the AWS search bar or find it under the Database section of AWS services. You should land on the RDS landing page as seen below.
Click on the Databases option on the left hand navigation pane. Then, click the orange Create Database button on the right hand side of your screen. You can see the process in the screenshot below.
Clicking Create Database will launch a wizard which we’ll discuss in the next section. Below is an image of the process.
2 – Aurora Serverless v2 Database Creation and configuration
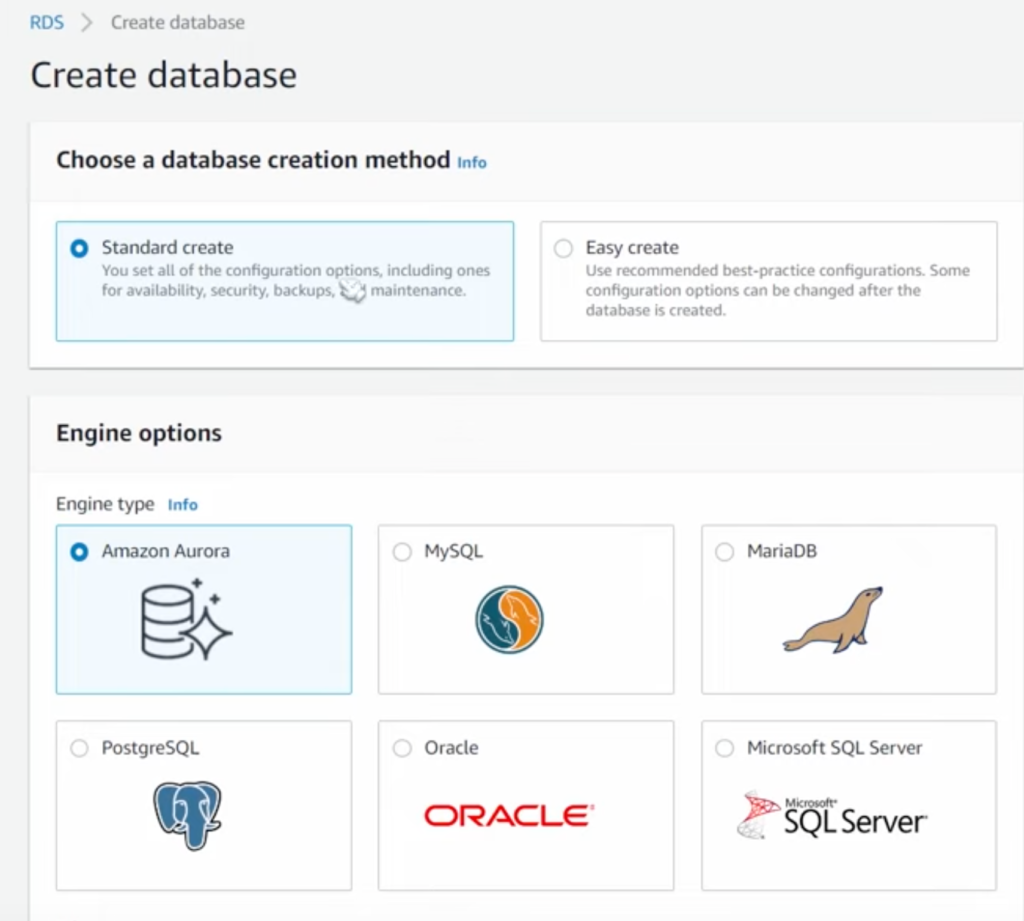
Our next step is to select and configure out Aurora Serverless V2 Database before launching it. The screenshot below shows the first couple of options for the wizard.
There are a lot of options here and I’m going to run through the main ones with you now.
First things first, select Standard Create. Easy Create select a bunch of options by default that will cost you some money.
Engine Details
Next, select your Engine Type to be Amazon Aurora and below that, select either the Postgres or MySQL compatible edition.
Now we need to select our Engine Version. Currently, Aurora Serverless V2 is compatible with a handful of MySQL and Postgres versions. For Postgres, this includes 13.6, 13.7, and 14.3. You can select 14.3 for this exercise.
For Dev/Test. This will default the wizard to disable things multi-az setups and replication.
You now need to select some DB Cluster Identifiers like name, master username, and master password. Set the cluster name to something meaningful and fill out a password that you’ll remember.
Instance Configuration and ACUs
For Instance Configuration, you’ll want to set the instance class to Serverless in the dropdown menu, click Serverless V2. We also need to fill out minimum and maximum ACUs or Aurora Capacity Units. ACUs are the scaling unit of Aurora Serverless.
The way ACUs scale up or down is completely handled by the Aurora service. The idea is that your Aurora database will automatically scale itself within the range of the minimum and maximum ACUs that you specify. Remember, we are talking about VERTICAL scaling here. This means that as ACUs rise, so does the power of the machine running your database. Adding more database nodes is known as horizontal scaling and is achieve through read replicas and replice autoscaling. More on that later.
You may say to yourself, shouldn’t I just always set the minimum ACU to 0.5 (the lowest value)? Why would I set it to anything higher?
Here’s a couple important reasons:
- The lower the ACUs, the lower the scaling rate when load increases.
- Anticipating periods of high traffic, you can scale to the right minimum in advance.
- Your workload has memory requirements that exceed the amount available in the corresponding ACU instance.
There’s some great advice on the AWS documentation here on choosing the right minimum ACUs.
For our exercise, lets pick a minimum of .5 ACUs and a maximum 1.
Availability and Durability
In this section, you can choose to increase your databases availability and durability. This is done through a feature called Multi-AZ Deployments.
Enabling Multi-AZ Deployments instructs Aurora to create a stand-by replica of your database in a completely different availability zone. As a reminder, AZs or Availability Zones are “one or more discrete data centers with redundant power, networking, and connectivity in an AWS Region. AZs give customers the ability to operate production applications and databases that are more highly available, fault tolerant, and scalable than would be possible from a single data center.”
Since all nodes in an Aurora Serverless V2 database share the same storage volume, redundancy is easy to implement.
In the event of an outage of your primary database (usually the writer node), Aurora will automatically fail over to the replica and assign it to be the new primary. Primary node failure is what AWS calls a failure event. In the multi-az case, your database will start throwing exceptions for read and write queries. The database is usually restored in under 60 seconds. This is akin to having a read replica in a different Availability Azone.
Remember all this only applies when you enable Multi-AZ Deployments.
If you have a primary database outage withe Multi-AZ Deployments disabled, Aurora responds by re-creating the database in the same AZ. Operations during this time will fail with an exception. When the new instance is created, the service will be restored. This can take up to 10 minutes.
The major benefit of enabling Multi-AZ Deployments is increased availability through faster failover time to a redundant node.
The major con is cost of having a second node in a different availability zone.
Since this is just a demo, I’ll lead Multi-AZ Deployments for this exercise.
Connectivity
In this demo, we’ll be using the Default VPC. The only setting we’ll change here is to Enable the setting for Public Access as seen below.
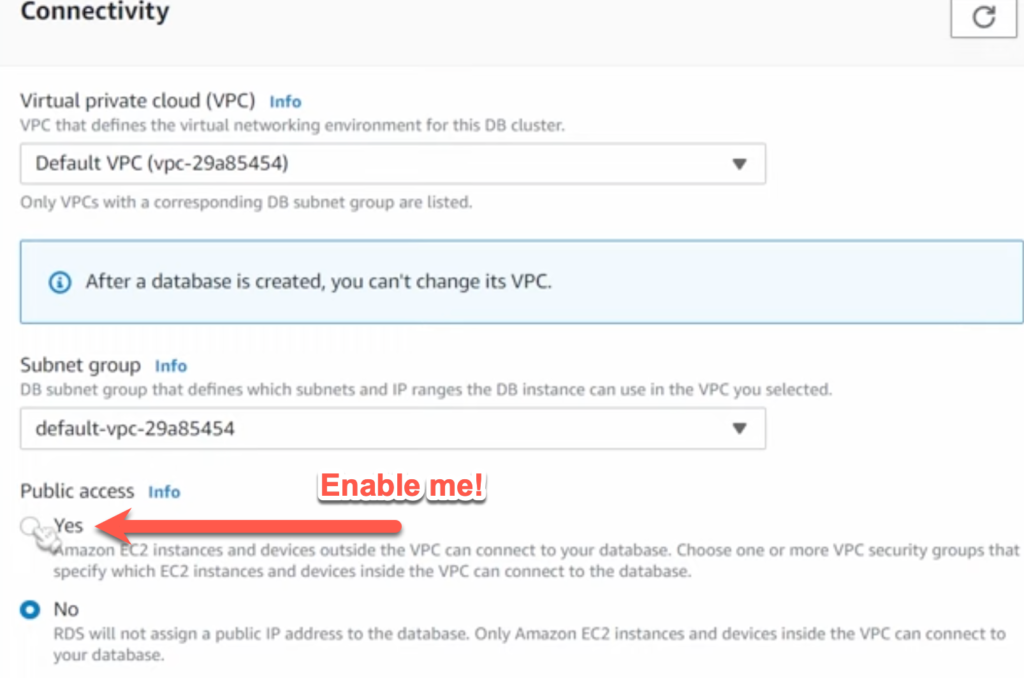
Note that enabling a database with public access is definitely not something you would do for a production scenario. In production, you would want your database with public access disabled and ideally in a private subnet with locked down permissions.
You can leave all other settings in the connectivity section as default.
Database Authentication
You can configure your database to include IAM or kerberos access in addition to password authentication. IAM access is a neat way to let IAM Users interact with your database without having a database account. Kerberos is an alternative authentication solution.
For an excellent article on IAM fundamentals check out this link
You can leave the remainder of the settings as default and click on Create Database in the bottom right.
You’ll be brought to the RDS home page and your Cluster and Database Instance will begin Creating as seen below.

It can sometimes take up to 10 minutes to fully complete setup, and even longer if you enable replicas or Multi-AZ deployments. It may be a good time to grab a coffee.
After a short while, you should see the Status change to Available. At which point we can try connecting to our instance.
But before we do, you’ll want to grab the endpoint of the database cluster. Do this by clicking on your cluster and scrolling down to the Endpoints section under the Connectivity and Security category. The below screen capture illustrates an example.

3 – Connecting to Aurora Serverless V2 Postgres Instance with pgAdmin
pgAdmin is a development and administration platform for Postgres databases. If you don’t already have it installed or want to learn more you can find details at their website here.
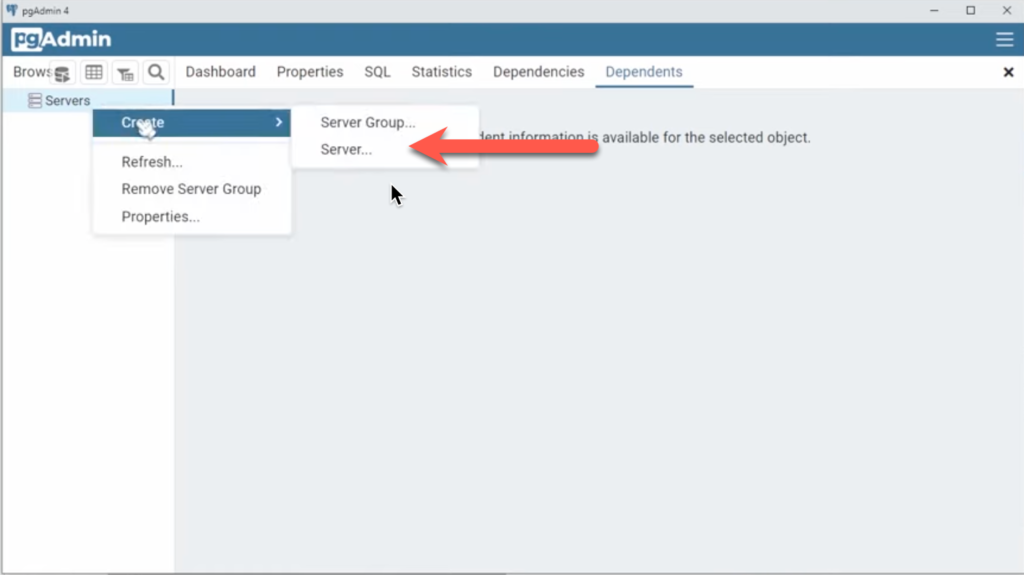
Launch up pgAdmin and right click on Server and click on Create > Server as seen below.
In the Create Server connection popup, fill out the Host name / address with the copied value from the last step. And fill out the default database username and password. In my case, mine was postgres and password respectively. Click on Save.
If you configured everything correctly, you should see no error popups and a new database entry in your left side bar. You can go ahead and start running queries against your database.
When you’re done, remember to clean up / delete your database. The minimum provisioned database at 0.5 ACUs costs almost $1.50 per day to run. So make sure to follow the step below to clean it up when you’re finished tinkering.
4 – Cleaning Up Your Database
To remove your database and cluster, we’ll need to delete the writer instance and all read replicas (if applicable). Once all instances are deleted the cluster will automatically be deleted as well.
Do do this, click each database instance and click on Actions > Delete. The database will start tearing itself down and be put in Deleting state before it is removed.
I hope this video was helpful in showing how to setup a Postgres compatible Aurora Serverless V2 cluster. Let me know if you have questions or comments below.


This is well understood and its working. However, do you have any way of creating Aurora ServerlessV2 via CloudFormation? That would really help.
Hey Robert, this feature was just announced! Check out my article on it here: https://beabetterdev.com/2022/10/06/amazon-aurora-serverless-v2-cloudformation-example/