


Building a CI/CD pipeline? Need an overview of basic concepts to keep in mind while building an ideal and practical CI/CD pipeline? Well, you are in the right place!
If you are new to cloud and not sure what your stack might look like or what your environment setup should be, this article will give you a solid starting point for your stack setup and general concepts involved in building a CI/CD pipeline. Along with that, we will cover other side items such as understanding of what a developer experience should look like when you’re developing on your local stack and how that fits into the CI/CD pipeline and different environments involved.
You will understand the concepts involved in building a CI/CD pipeline that uses any technology of your choosing. This can include providers such as AWS, Jenkins, or even a custom tool deployment orchestration system you build yourself.
Let’s get started!
CI/CD Pipeline Stage 1: Source
As the name suggests, source code is where you have all your application code, packages and relevant dependencies stored.
For example, a GIT repository.
Require Reviewers:
At the source control level, there is one most important thing to note – Reviewers.
To ensure that people having access to the repository do not randomly merge the code into your source control, you should have some level of reviewers.
The reviewers will need to approve the pull requests in order to merge code changes to the next stage or parent branch. You should have at least 1 reviewer. However, minimum of 2 reviewers are recommended.
CI/CD Pipeline Stage 2: Build
After source code, it automatically goes to the build step. That being said, you should have the ability to enable or disable this transition from source code to build at any point in time as there might be cases where you would not want to build on the code changes right away.
For example, you should have ability to disable the stage in pipeline if you have to wait for someone to finish their testing before you deploy or do not want not build right away when anyone pushes the changes to code.
Similarly, each stage should have such ability to turn on or off the transition to next stage. This helps you to control what gets promoted to the next step of your CI/CD deployment pipeline.
Compile Source Code and Dependencies
Compile all your source code and all the dependencies that are included in the project.
Run Unit Tests
Run all the unit tests that are relevant to your project. If you are building a CI/CD pipeline, you need unit tests and a high coverage level of those unit tests to make sure your application is running and working correctly.
Unit tests are a must have. The main goal of having CI/CD pipeline is for you to be able to basically blindly push a commit into your source control and be confident that it will be caught at one of these later steps in the process.
If you do not have unit tests or high coverage on your source code, your pipeline is error prone. So when wrong code is committed and it flows through to the next stage, you are going to have errors and will need to roll back everything to the previous successful commit.
You can take advantage of lots of different tools available these days to show whether or not a line of your code is being tested.
Check and Enforce Code Coverage % (90+)
Code coverage is covered by testing frameworks (such as TestNG or JUnit for Java) to output the code coverage percentage.
Ideally, you would want to have a minimum of 90 percent or so. Any subsequent commit should not be lower than this threshold and should be increasing with each commit. In a lot of cases, people do not strive for a complete 100% because it becomes meaningless at a certain level. Generally, a higher number is usually better.
CI/CD Pipeline Stage 3: Test Environment
After code commit and running unit tests, now comes the test environment where you can test all your code changes. This will make you comfortable that your code changes are ready for the next stage.
The idea of having a test environment is to test core logic of your application, kind of a sandbox to try things out. You can also have your own local version of the application that’s associated with the test environment.
Run Integration Tests
It is important to run integration tests in your test environment to ensure your application’s behavior is as expected in terms of business logic and functional aspects.
For example, if you have an API to create orders, you should have an integration test that executes the create order API and ensures that it gives the correct outcome. Now, if you call create order API with an expected input, you should also have a test function that calls get order API right after to look at what order contains and ensure it contains all items sent from create order API. If the outcomes are not as expected, something’s wrong!
Another example, if you have a create order API and there is some business rule in your application. According to that business rule, it is not allowed to create an order where the total is over X dollars. You should have an integration test that tests this functionality in your application.
Another example, let’s say you have a create order API that has dependency on a customer profile service. You should be testing customer profile service as well along with the create order API. So when you run that create order API, it should extract expected information from customer profile service.
Test the core functionality of your APIs, the dependencies between different services to see if they are doing what you are expecting them to do, and the end-to-end workflow of the system!
The more tests you have, the more confident you can be about your application.
CI/CD Pipeline Stage 4: Prod Environment (1 Box)
The 1-box production environment concept can be used to avoid a bad change being deployed into your full-blown production environment.
Now, if you have a small to medium-sized organization then having a test in the production environment is just fine. However, the larger your organization gets, the more environments that you may need.
For example, having a pre-production environment can be useful if there are multiple people testing different things at different times or creating a separate branch to test something specific.
For larger organizations, this is a critical step in any CI/CD pipeline. Idea of having 1-box represents that just a fraction of your production traffic is directed to one of the hosts with the code changes deployed.
For example, let’s say you have 10 hosts and out of which 1 host is your 1-box host. Configure this 1-box host to receive 10% or less of your production traffic. Now, monitor your application changes using this 1-box host. If something goes wrong on this host, you can rollback that change right away. Now imagine if you had gone from test to production environment directly, you would have to rollback all 10 hosts instead of 1.
You can use several ways to direct traffic in between multiple hosts. One way is to do it at the DNS level, where you can direct N hits to the URL in the 1-box host and rest to other production hosts.
Major benefit – in case of bad deployment, having this concept saves you lots of time! Having to rollback one host will be a pretty straightforward process as compared to rolling back all hosts. Just disable that 1-box host and previous version of your code is in your other production hosts already, as easy as pie!
Alarms on Errors, Latency, Key Business Metrics
It’s a good concept of integrating alarms in the deployment process, specifically rollback alarms that monitor a particular environment.
Your rollback alarm should monitor errors, latency, version of software, key business metrics, threshold values, abnormal patterns, etc. In case anything gets elevated here, take that as an indicator to rollback your change.
A good CI/CD pipeline should be configured to monitor these types of metrics for the environment. It should be able to automatically rollback when it determines that any of these metrics have exceeded the threshold.
Bake Period – 24 Hours
This bake period is kind of a confidence building step. You can have a bake period of your choice, depending on when your deployment occurs.
Recommended bake period is 24 hours. you can probably reduce it to a shorter time period if you are thinking about deploying it during a high volume time frame. In case you are deploying during a high volume time frame, you can probably reduce it to a shorter time period.
Let’s put it this way, sometimes things do not fail right away or stop working as expected. Errors might occur even after tests run successfully and that’s why a big bake period is important. Let your change sit for a period of time and if nothing abnormal happens, move to the next stage.
Anomaly Detection
Anomaly detection identifies points, events or metrics that deviate from your application’s normal behavior. It can sometimes be overkill for a lot of systems and is a bit expensive too.
Error Counts + Latency Breaches
If you do not want to use anomaly detection, an easier way is to set alarms. Set up alarms to monitor the error counts and latency breaches over a period. If the sum of the alarm metrics for specific timeframe exceeds the threshold, automatically rollback to the previous state.
Health Checks
Health checks are used to test your production workflow on a consistent basis at a certain interval. It also ensures the worflow results in an expected outcome.
For example, you can set up a health check on your create order API. A CRON job that triggers a function every minute, calling create order API with an expected input and hard-coded expected outcome. The health check will continuously call that API with an input every minute. If the API starts failing or starts resulting in a different outcome, it is an immediate indicator of something being wrong with your application.
As soon as health check receives different outcome than expected, it runs through key alarms, things to monitor and ultimately goes back into rollback alarm to roll back your changes to previous version of your application.
CI/CD Pipeline Stage 5: Prod Environment
Final stage of your CI/CD pipeline, where all your hosts are located and is the front-end point where all the traffic is going to hit!
After going through all the stages above, your code changes are ready to be deployed to production environment.
Make sure to run the same kind of checks in the production environment as your 1-box environment.
By this time, you should feel pretty confident in your deployment using CI/CD pipeline.
Conclusion
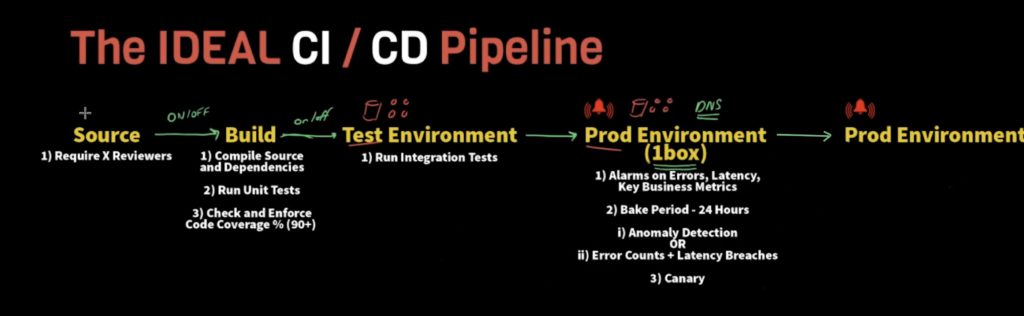
To recap, here’s an ideal CI/CD pipeline should look like:
- A source requiring the reviewers.
- Build steps to commit code changes, compile source and dependencies, run unit tests, and check and enforce code coverage percent.
- A test environment to run integration tests to test the functional aspects and business logic of your application.
- An optional pre-prod environment.
- 1-box in prod environment serving a portion of the traffic. A health check set up on it to rollback the changes if something goes wrong.
- A full-blown prod environment which serves remaining traffic.
You may be interested in…
AWS S3 Core Concepts – The Things You Need To Know
How To Test your AWS Lambda Function Locally with CDK
How to Learn AWS – Starting Points for Frontend, Backend, Devops, and Data Engineers


