Trying to subscribe an SNS topic to an SQS Queue or Lambda function in a different account? Learn how in this article.
If you work in any organization its likely that you use multiple AWS accounts to host your infrastructure. Its common in many companies, especially those that use service oriented architecture, to have subscribers and consumers in different accounts.
Setting up a cross-account SNS topic subscription to a consumer like a Lambda Function or SQS Queue requires a special process. In this article, I’m going to walk you through the easiest possible way to set up a cross account subscription from an SNS topic in account A to a SQS queue in account B.
Before I show you how to set this up, its worthwhile talking about two different ways to subscribe your topic to your consumer – the wrong way and the right way. Lets start by talking about the bad way.
Wrong Way – SNS Topic Owner Subscribes the SQS Consumer
In this method, the SNS Topic owner subscribes the SQS Queue consumer. This is possible either through the AWS CLI, CDK, CloudFormation, or the console.
The consumer is responsible for confirming the subscription request before data can start flowing. To do this, the SQS queue owner must poll their queue to find the confirmation message.
The confirmation message looks like following and must be clicked to start receiving notifications.
https://sns.us-west-2.amazonaws.com/?Action=ConfirmSubscription&TopicArn=arn:aws:sns:us-east-2:123456789012:MyTopic&Token=2336412f37fb...Why is this a bad method?
There’s a couple reasons this method is a bad idea.
For one, if a consumer is using infrastructure as code and trying to launch their stack, they’ll never be able to subscribe their SQS queue to your topic without engaging the topic owner. This creates a tight coupling between the consumer and the producer.
Second, this method requires a series of annoying manual process steps. You need a person subscribe the endpoint, poll the queue, confirm the message, etc. In a CI/CD pipeline, we certainly want to limit as many manual steps as possible.
Right Way – SQS Queue Owner Subscribes the SNS Topic
In this method, the SNS topic owner provides sns:subscribe permission to the SQS account. This allows the Queue owner to directly subscribe itself to the SNS topic without requiring any confirmation from the topic owner.
Further, its also a good idea to provide the SQS queue owner with the sns:unsubscribe permission so that it can remove its subscription at will.
This is the method we’ll be using in this tutorial.
Cross Account SNS to SQS Subscription Through the AWS Console
Step 1 – Modify SNS Topic Access Policy
Our first step is to modify our SNS Topic’s access policy. An access policy is a resource based policy applied to your SNS topic that determines who can perform action upon it.
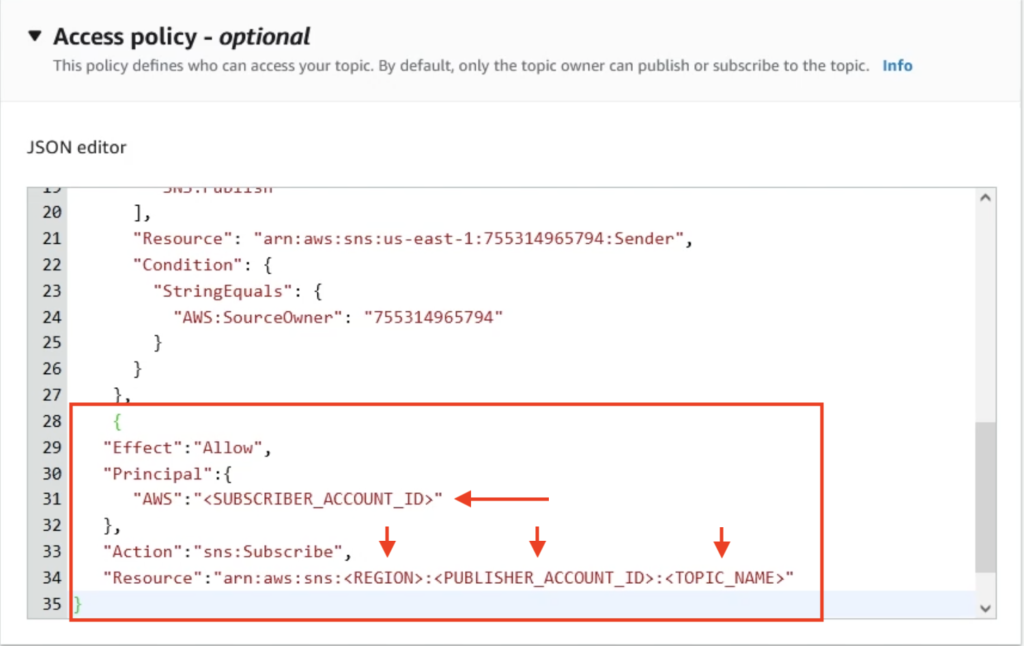
In order to provide our SQS queue with the permission to subscribe, we need to add the SQS Queue’s account id to the access policy. We also need to provide it with sns:subscribe and sns:unsubscribe (optional) actions.
You may also enjoy…
What is AWS SNS? (with examples)
Why you need to start creating your Infrastructure with Code
AWS CloudFormation Tutorial: Concepts, Workflows, and a Hands on Walkthrough
To do this in the console, navigate to your SNS topic and click on the Edit tab.
We’ll need to add a new Statement to our access policy with the following template. Note that a link to this policy statement can be found on github here.

There are four substitutions we need to make in this policy statement. First, modify the SUBSCRIBER_ACCOUNT_ID with your SQS queue’s account id.
Next, modify your region to whatever region your SNS topic is in. In my case, that’s us-east-1. Also change the PUBLISHER_ACCOUNT_ID and TOPIC_NAME to the relevant details for your SNS topic.
Here’s what mine looks like after the substitutions (excuse the improper JSON formatting).

Modifying SNS Access Policy with the CLI
If you prefer to modify your access policy through the CLI, you can use a simple command as follows:
aws sns add-permission -\
    -topic-arn arn:aws:sns:us-west-2:123456789012:MyTopic \
    --aws-account-id 987654321098 \
    --action-name Subscribe
Again, make sure to swap our the relevant details for your SNS topic. The –aws-account-id value should be set to the SQS queue’s account id.
Modifying SNS Access Policy with CloudFormation
To modify our topic’s access policy using cloudformation, use the following yaml code to provide the SQS account with the subscribe permissions.
SNSAccessPolicy:
    Type: AWS::SNS::TopicPolicy
    Properties:
     PolicyDocument:
       Id: <Yourtopic>
       Statement:
         -
           Action:
            - "SNS:Subscribe"

           Effect: Allow
           Principal:
             AWS: "arn:aws:iam::<SQSAccountId>:root"
           Resource:
             Ref: <Yourtopic>
     Topics:
       -
         Ref: <Yourtopic>
Be sure to keep any other policy statements you have on your topic so you don’t accidentally remove any permissions.
Step 2 – Subscribe our SQS Queue to the SNS Topic
Now that our SQS queue account has the correct permissions, we’re ready to subscribe it to the SNS Topic.
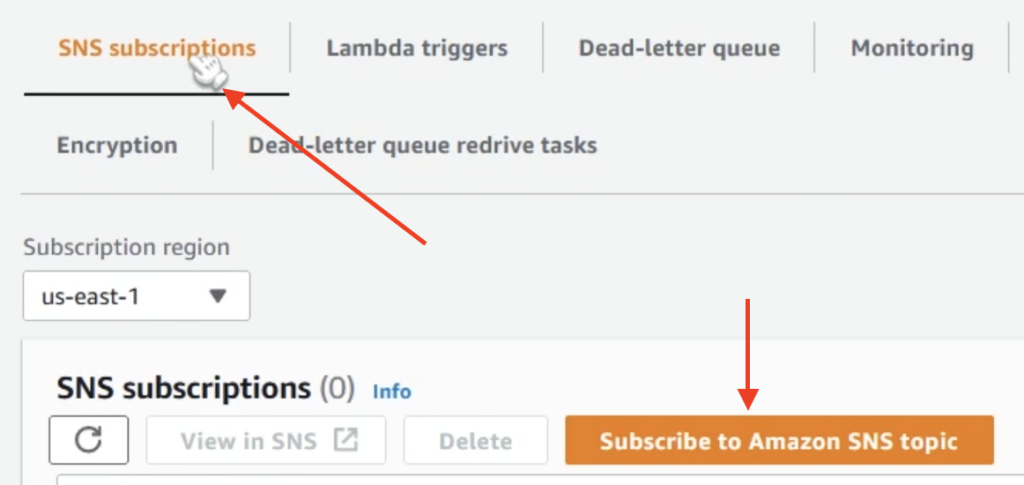
To do this through the console, navigate to your SQS queue and click on the SNS Subscriptions button. From there, click on the orange button that says Subscribe to Amazon SNS Topic as seen below.

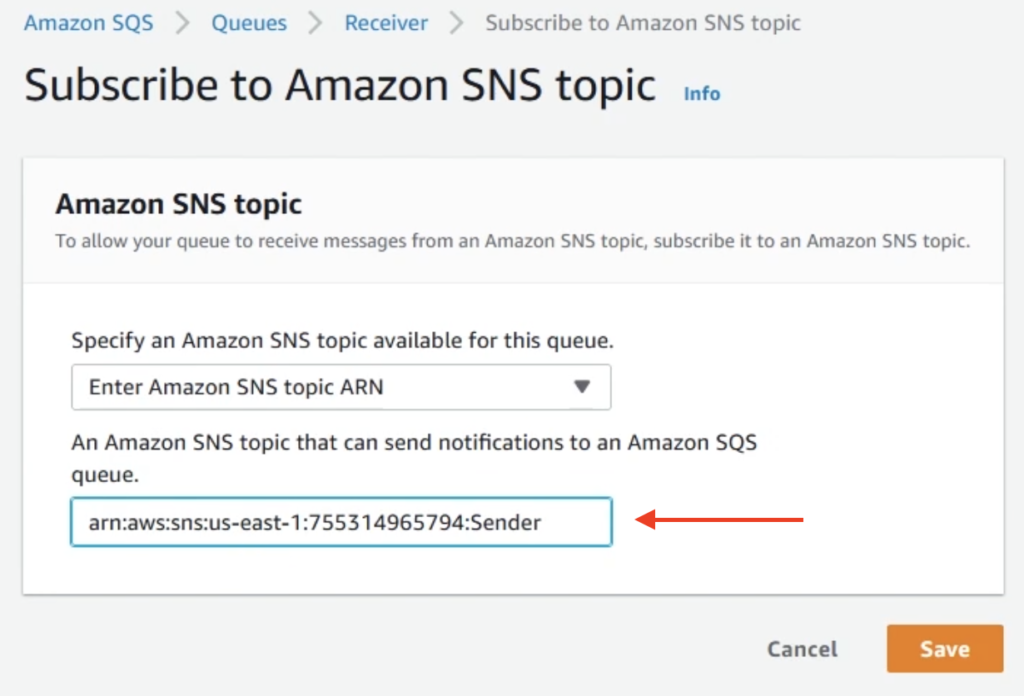
In the next screen, we simply need to add in the ARN from the SNS topic which can be acquired on the SNS topic’s details page. Add this value into the prompt and click on Save as seen below.

Subscribing your SQS Queue with the AWS CLI
To subscribe your SQS Queue to the SNS topic using the AWS CLI, use the following command:
aws sns subscribe \
    --topic-arn arn:aws:sns:us-west-2:123456789012:my-topic \
    --protocol sqs
Be sure to swap out the SNS topic ARN with the correct one.
Subscribing your SQS Queue with CloudFormation
If you prefer to manage your subscriptions through CloudFormation, use the following command:
  SnsSubscription:
    Type: AWS::SNS::Subscription
    Properties:
      Protocol: sqs
      Endpoint: <Queue_Arn>
      Region: <Region>
      TopicArn: <Topic_Arn>
Again, make sure to swap out the relevant values.
Step 3 – Confirm Everything is Working
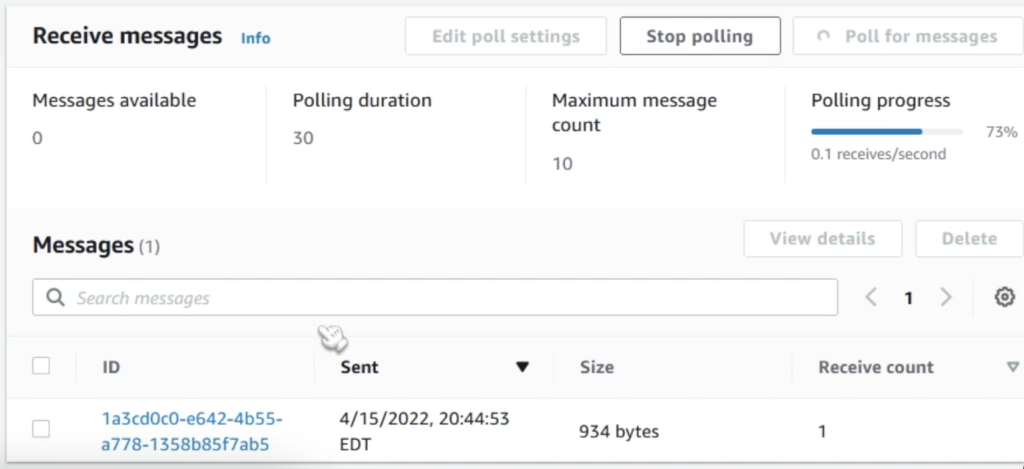
After subscribing your SQS queue, you should be able to start receiving messages. To test this out, publish a message to your SNS topic on Account A. If you poll your SQS queue through the console (as seen below), you should see the corresponding message.

If this didn’t work, double check your access policy and account ids – this is the most common mistake folks make during setup.


Do you know if the communication between both aws accounts in this scenario will be through internet? or it going to happen internally in AWS?
Thank you so so so much. I took nearly 2 days to know the resolution. Finally I’m about to give up and then in the last try I got the resolution here.