Have you ever wondered best way to store application configuration in the cloud? Learn all about AWS Parameter Store and how to use in this article.
In recent years, feature flags have become an increasingly popular way to control application behaviour without having to do a deployment. Using a little planning and some simple logic, developers can use the value of a feature flag to launch a subtle feature, or gradually dial up a brand new application behaviour.
In the past, most developers stored configuration values in a file alongside their deployment package. This works great for simple configuration that is read only once at runtime—but not so much for feature flags when values can be changed regularly. In a distributed application with many many machines, applications require a scalable solution that can be used to create, read, and update configuration in a consistent and reliable way.
This article is about AWS Parameter Store – a configuration management service that makes it easier to use and deploy application configuration. In this post, we’ll first go over the main features of Parameter Store and some of its key benefits. In the second part, we’ll talk about how to easily integrate the values you store in Parameter store into your application.
So let’s get into it.
What is AWS Parameter Store?
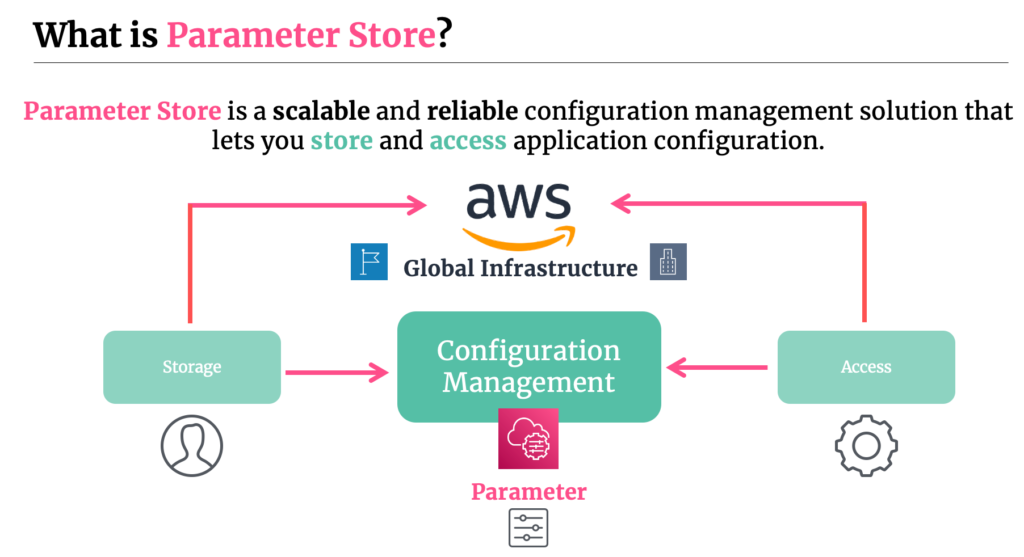
AWS Parameter Store is a scalable, reliable, and secure configuration management solution that lets you store and access application configuration on the AWS cloud. Parameter store runs ontop of AWS Global Infrastructure—this means that you can be confident your data is stored durably and remains accessible even in the scenario of an availability zone outage.

Common use cases of Parameter Store are to hold password databases, license codes, feature flags (aka dynamic config), and many others. The service can be used for any use case where you want to store text for reliable storage and retrieval.
When using Parameter Store, you are generally concerned with two processes: storing your parameters, and accessing them from your application. Lets jump a little bit deeper into some of the features Parameter Store offers in terms of Storage.
Parameters
Parameters are the lowest level building blocks of Parameter Store. They are key/value entries that can store plaintext or structured data (such as JSON or XML). Keep in mind that Parameter Store does not validate the schema of your Parameter values – that will be up to you as the user. You can also label versions of your parameter with an appropriate name to keep track of changes over time.
When creating a Parameter, you can choose from three different types: Strings, String Lists, or Secure Strings. Strings are just an arbitrarily plaintext or structured text field. String Lists are entries separated by a comma such as a,b,c. Secure Strings are meant for values such as passwords or license keys that aren’t meant to be visible to the user. When using Secure Strings, Parameter Store will automatically encrypt and decrypt your Parameter using a Keymaster Service (KMS) key that you provide, or alternatively one managed by AWS.
Two Tiers of Parameters
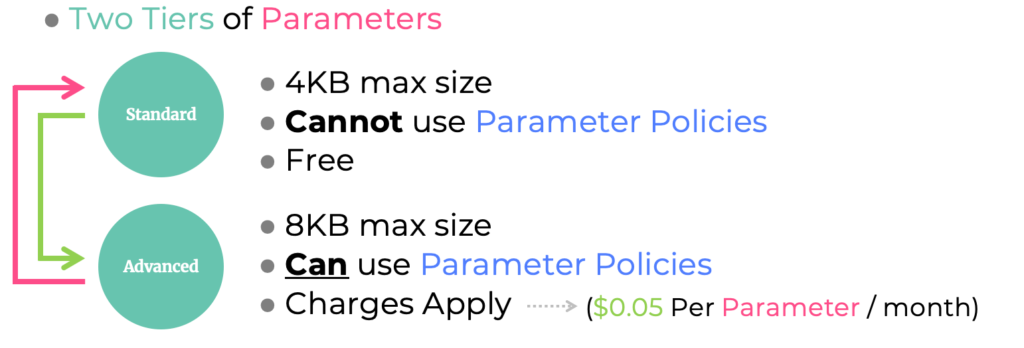
When creating a Parameter, you have the ability to choose from two different types: Standard and Advanced. There are some subtle distinctions between the two in terms of storage size, features, and pricing.

Standard Parameters offer up to 4KB of size for each parameter, are totally free to use as long as you don’t enable the higher throughput functionality. The higher throughput mode is useful for applications that require thousands of GetParameter API calls per second. Additionally, Standard Parameters do not support Parameter Policies which allow you to define an expiration date or time to live on your parameter (more info here).
Advanced Parameters offer 8KB of storage size per parameter—nearly double of what standard offers. Advanced Parameters also come with a cost which is $0.05 per parameter per month, and $0.05 per 10,000 API interactions. Finally, Advanced Parameters also support Parameter Policies which as mentioned prior, allow you to expire your parameters at a specific or relative time.
One thing to keep in mind when selecting a type is that if you choose to go with an Advanced Parameter, you cannot switch back to a Standard Parameter. This is because switching back will cause the service to have to truncate the 8KB parameter into 4KB – something that AWS doesn’t allow. If you’re looking to downgrade, you’ll need to create a brand new Parameter. You are, however able to upgrade from Standard to Advanced at any time.
Creating and Accessing Your Parameters
When using Parameter Store, you first create your Parameter either directly in the AWS Console, or programmatically. You simply specify the name of your parameter, the type, and the value you’d like associated with it. If you’d like to change its value, you can come back to the console at any time to modify it. Note that Parameter Store retains the history of your configuration values over time. This includes the previous values, when they were created, and who created them. This is useful from an auditability perspective.
Access to Parameter Store is maintained through the Identity and Access Management (IAM) service. This means that you can deny access to the values of Parameter Stores by both humans or applications by associating your Parameter with an IAM Policy. Conversely, you can allow users or applications to access it with an appropriate policy.
In terms of accessing your Parameter in an application, you have two main options. The first is to integrate directly with the GetParameter API. This is simple and straightforward to use. Any time your application (either on startup or periodically at some point later) needs to access the parameter, it simply makes an API request.
One problem with Parameter Store is that it is a pull-based system. That means that updates to the value of your Parameter will be invisible to your application until it makes a new call. In other words, your Parameter can become stale shortly after reading it.
Using the GetParameter method directly doesn’t solve this problem. You may need to build a background process that periodically pols Parameter Store to retrieve values in case they update.
That’s the bad news. The good news is that users of popular services like AWS Lambda do not have to worry about this complexity at all. Parameter Store offers an extension that easily integrates with AWS Lambda and takes the responsibility of fetching, caching and periodically polling Parameter Store for updates. This method makes integrating with Parameter Store a lot easier and can even save you a bunch of money if you have a high throughput application. You can read more about the Parameter Store Lambda Extension here.
So far, we’ve talked a lot about what Parameter store has to offer. There are however other options in the domain of configuration management that you should know about. The other competitor to Parameter Store is AWS AppConfig. Lets quickly discuss the difference between Parameter Store and AppConfig to understand when it makes sense to use one over the other.
Parameter Store vs AppConfig
AppConfig is another service that sits under AWS Systems Manager. Similar to Parameter Store, AppConfig allows users to store arbitrary configuration values. However, it also includes a robust configuration deployment system, auto-rollbacks, schema validation, and more.

Using AppConfig, you can introduce configuration changes progressively into your application with a new configuration deployment. The deployment can be configured to slowly roll out the changes over time, and listen to Cloudwatch alarms for any application errors. You can also easily use AppConfig to roll back your changes too if errors are detected.
In addition, another notable AppConfig feature is in terms of configuration validation. The service allows you to write a validator using a JSON Schema or a Lambda function that will check your configuration for errors. AppConfig also has its own version of Lambda Extensions (in case you’re a fan).
If you can’t tell already, AppConfig contains a number of impressive bells and whistles over Parameter Store—and that’s the point. Parameter Store is a bare bones free form data store that can be used for hot or cold configuration data. AppConfig on the other hand, is a more robust product with more safety and validation features built for modern applications.
The TLDR is, if you want a service that offers bare bones Configuration Storage and access, go with Parameter Store. If you want all the bells and whistles AppConfig offers including progressive rollout, autorolbacks, or schema validation, go with AppConfig.
Using Parameter Store
Using Parameter Store requires two steps: creating your parameter and accessing your parameter. Creating your parameter is straight forward and can be done in the console using the UI. Let’s focus on how to retrieve Parameters from your application.
Note: I’ll be using Python and boto3 to use the GetParameter API in Parameter Store. Here’s the documentation link with all the other APIs that you can check out.
Strings and String Lists
Here’s an example of how to use the GetParameter API using Python and boto3 for a String or String List—note that when you use the Secure String type it requires a slightly different syntax (described further below).
import boto3
client = boto3.client('ssm')

response = client.get_parameter(Name='YourParameterStoreName')
print(response)
This yields the following result:
{
    "Parameter": {
        "Type": "String",
        "Name": "YourParameterStoreName",
        "Value": "YourValue"
    }
}
Using Secure String
If you create a Secure String Parameter type, your call to Parameter Store will need to be:
response = client.get_parameter(Name='YourSecureStringParameter', WithDecryption=False)Notice the inclusion of the WithDecryption field. This field is only relevant when attempting to access SecureString types. If you provide it in your request when using a normal String or String List type, it will be ignored.
When using WithDecryption=False, Parameter Store will return the encrypted value of the string that you stored using the KMS key you provided upon Parameter creation. The result of the above call looks like:
{
    "Parameter": {
        "Type": "SecureString",
        "Name": "YourSecureStringParameter",
        "Value": "AQECAHgnOkMROh5LaLXkA4j0+vYi6tmM17Lg/9E464VRo68cvwAAAG8wbQYJKoZIhvcNAQcGoGAwXgIBADBZBgkqhkiG9w0BBwEwHgYJYZZIAWUDBAEuMBEEDImYOw44gna0Jm00hAIBEIAsjgr7mum1EnnXzE3xM8bGle0oKYcfVCHtBkfjIeZGTgL6Hg0fSDnpMHdcSXY="
    }
}
If you change your request to use WithEncryption=True, Parameter Store will decrypt the value at request time using the KMS key, and return the plaintext value. Here’s what the request and response will look like in this case.
response = client.get_parameter(Name='YourSecureStringParameter', WithDecryption=True)And the response:
{
    "Parameter": {
        "Type": "SecureString",
        "Name": "YourSecureStringParameter",
        "Value": "The Secret Value... SHHHH"
    }
}
If you’re interested in learning more about how AWS manages encryption and decryption for Secure Strings using KMS, check out the AWS Documentation here.
If you enjoyed this article, check out these other relevant ones you may be interested in:


